
How to Convert HEIC to JPG on a Mac: 5 Free Ways (2026)
Convert HEIC to JPG on a Mac with no extra software — Finder, Preview, Photos, Shortcuts, or Terminal. Tested on a real iPhone photo, including what happens to GPS.
By HeicToPng Team

Quick answer
The fastest way to convert HEIC to JPG on a Mac needs no app at all: in Finder, right-click the HEIC file, choose Quick Actions → Convert Image, set the format to JPEG, and click Convert to JPEG. The JPG appears next to the original.
Four other built-in routes are worth knowing, depending on where your photos live and how many you have:
| You have… | Use |
|---|---|
| A few HEIC files in a folder | Finder Quick Actions |
| One photo and you care about file size | Preview (quality slider) |
| Photos already in the Photos library | Photos → File → Export |
| Hundreds of files, or a recurring job | Terminal (sips) or Shortcuts |
All five are free and run locally. We tested them on a 2017 MacBook Pro running macOS Ventura 13.6 with a real photo from an iPhone 17. Menu names are the same on newer macOS versions; Apple's current Finder guide documents the identical Convert Image action.
Method 1: Finder Quick Actions (fastest)
Quick Actions arrived in macOS Mojave, and the Convert Image action has been part of Finder since macOS Monterey. It works on one file or a whole selection.
- Open the folder with your HEIC files in Finder.
- Select one or more files. Command-click to pick several, or Command-A for all.
- Right-click (or Control-click) the selection and choose Quick Actions → Convert Image.
- Set Format to JPEG and pick an Image Size. Keep the largest size unless you want smaller files.
- Click Convert to JPEG.
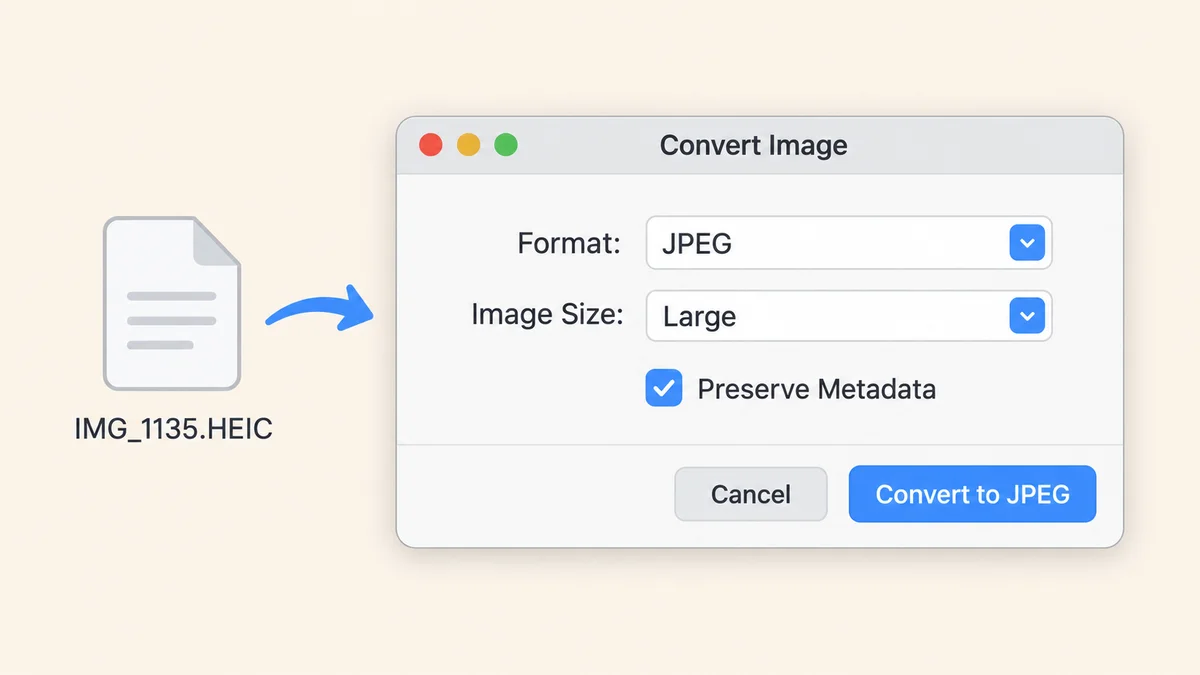
The originals stay untouched. Each JPEG lands in the same folder with the same file name.
There's no quality slider here. If you need to control compression, use Preview instead.
The same dialog has a Preserve Metadata checkbox. Leave it on if you want to keep the date the photo was taken. Turn it off if the photo is going somewhere public and you'd rather not share where it was taken; the section on GPS below explains why that matters.
Method 2: Preview (when you want to control file size)
Preview is the better choice when the JPG has to fit a size limit — an upload form that caps attachments at 2 MB, for example.
- Double-click the HEIC file. It opens in Preview by default.
- Choose File → Export.
- Open the Format pop-up and select JPEG.
- Drag the Quality slider. The estimated file size updates as you move it.
- Choose a location and click Save.
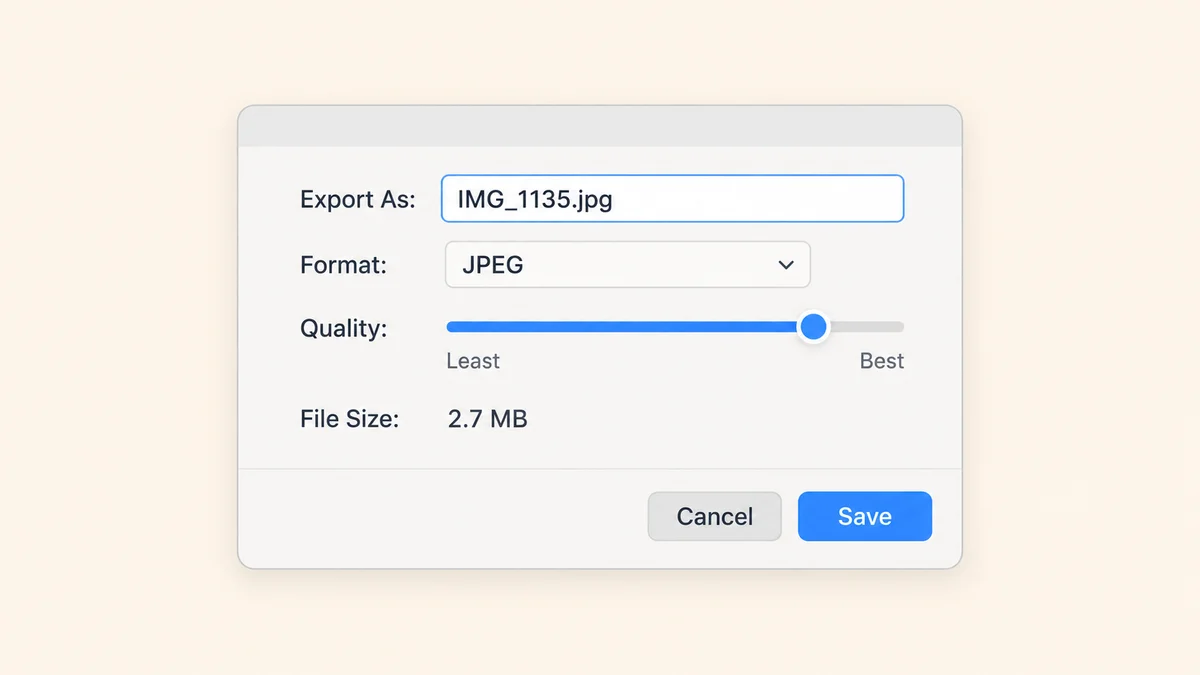
To convert several files at once, Apple's instructions are to open them in one Preview window, select them all in the sidebar, then export. You'll get one JPG per file.
The same Format menu offers PNG, which is lossless. If you need an exact copy of the pixels rather than a smaller file, convert HEIC to PNG instead.
Method 3: Photos app (photos already in your library)
If the pictures came to your Mac through iCloud Photos, they're sitting in the Photos library, not in a folder. Export them from there.
- Select the photos in Photos.
- Choose File → Export → Export [number] Photos.
- Set Photo Kind to JPEG and pick a JPEG Quality.
- Under Include, decide whether to keep Location Information.
- Click Export and pick a folder.
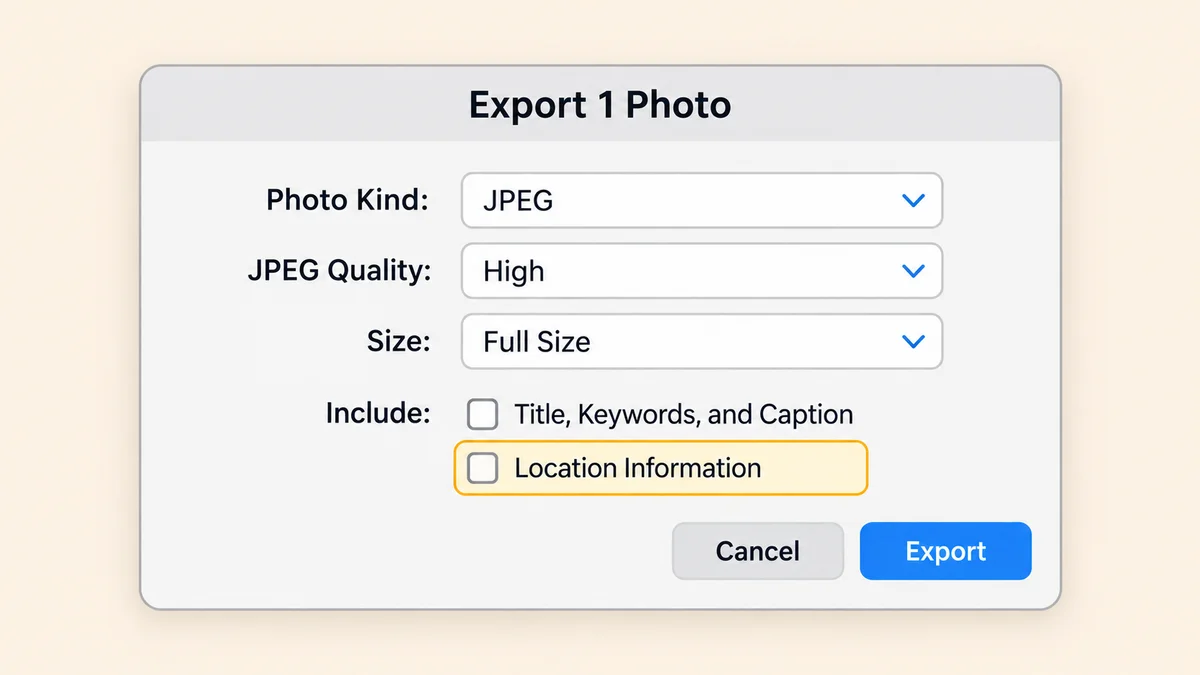
Avoid Export Unmodified Original for this job. It writes the original HEIC file, which is exactly what you're trying to get away from.
Apple also describes dragging photos from Photos to a Finder window as the easiest way to export. It's quick, but you don't get to choose the format, quality, or whether location data comes along. Use the Export dialog when any of those matter.
Method 4: Batch-convert hundreds with Terminal or Shortcuts
Every Mac ships with sips, a command-line image tool that uses the same image engine as Preview. For a folder full of HEICs, it's the quickest route by far.
Open Terminal, cd into the folder, and run:
mkdir -p jpg
sips -s format jpeg *.HEIC --out jpg/
That writes a JPG for every HEIC into a jpg subfolder, and sips renames the extension to .jpg on its own. The originals stay where they are. If some of your files use a lowercase .heic extension, run the command again with *.heic.
To make the files smaller, add a quality setting:
sips -s format jpeg -s formatOptions normal *.HEIC --out jpg/
formatOptions accepts low, normal, high, best, or a number from 0 to 100. Our test numbers for each are in the next section.
On our 2017 Intel MacBook Pro, three HEIC files, including a 24-megapixel iPhone 17 photo, converted in about three seconds. Apple Silicon Macs will be faster.
If you'd rather not touch Terminal, build a Shortcut once and reuse it. In the Shortcuts app, create a new shortcut, turn on Use as Quick Action for Finder, and add two actions: Convert Image (set to JPEG, with its own Quality and Preserve Metadata options) and Save File. It then shows up in Finder's Quick Actions menu next to Convert Image, with whatever defaults you chose.
What happens to size, quality, and GPS data (tested)
We converted the same photo — IMG_1135.HEIC, shot on an iPhone 17 at 5712 × 4284 pixels — with sips at different quality settings and checked the results.
| File | Size | vs. the HEIC |
|---|---|---|
| Original HEIC | 2.01 MB | — |
JPG, default (same as high) | 2.70 MB | +34% |
JPG, formatOptions 85 | 3.65 MB | +81% |
JPG, formatOptions normal | 1.29 MB | −36% |
Two things stand out.
The JPG is usually bigger than the HEIC. That's expected. HEIC stores the image with HEVC compression, which is roughly twice as efficient as JPEG at the same visible quality. Converting doesn't add detail, it just uses a less efficient container. Our HEIC vs JPG comparison goes deeper on why.
Numbers on the quality scale don't mean what you'd guess. 85 produced a larger file than the default preset. If file size matters, try normal first and check the result by eye.
The bigger surprise was the metadata. Every JPG we produced kept:
- The camera model and lens (
iPhone 17 back dual wide camera 5.96mm f/1.6) - Exposure settings and the original capture date
- The Display P3 color profile
- The GPS coordinates of where the photo was taken
That last one matters. Convert a photo taken at home, post the JPG to a public forum or marketplace listing, and the location travels with it. Some platforms strip it on upload. Plenty don't, and email attachments never do.
To remove the location before you share:
- Photos: untick Location Information in the Export dialog (Method 3).
- Preview: open the JPG, choose Tools → Show Inspector, open the GPS tab, and click Remove Location Info.
- Finder Quick Actions: turn off Preserve Metadata. This removes the capture date and camera details too, not just the location.
Which method should you use?
| Method | Batch | Quality control | Location data | Best for |
|---|---|---|---|---|
| Finder Quick Actions | Yes | No (size only) | On/off with all metadata | A few files, fast |
| Preview | Yes | Slider | Kept; remove in Inspector | Hitting a file size limit |
| Photos | Yes | Low → Maximum | Checkbox | Photos in your library |
Terminal (sips) | Hundreds | Presets or 0–100 | Kept | Big folders, repeat jobs |
| Shortcuts | Yes | Quality setting | Preserve Metadata toggle | Your own one-click workflow |
For most people, Finder Quick Actions covers it. Reach for Terminal when the folder has more files than you want to click through.
When the Mac's built-in tools aren't enough
The built-in tools cover most cases. A few situations where they fall short:
- You're on someone else's Mac, a shared or managed machine, and don't want to touch their Photos library or Shortcuts.
- You want the GPS gone but the capture date kept, in one step. Finder's checkbox is all-or-nothing.
- You need WebP rather than JPG. Preview's Format menu doesn't offer it.
For those, our browser-based converter lets you convert HEIC to JPG with a compression-level slider and separate switches for keeping EXIF data and removing the GPS location. By default it keeps no metadata at all. It runs entirely on your Mac inside the browser, so the photos are never uploaded.
If the photos come from your own iPhone and you're tired of converting them, you can stop your iPhone from shooting HEIC in the first place. JPEGs take roughly twice the storage, so it's a tradeoff, not a free fix. And if you're sending the photos to someone on a PC, our guide to fixing HEIC files that won't open on Windows covers the other side.
References
- Apple Support — Perform Quick Actions in the Finder on Mac
- Apple Support — Convert image file types in Preview on Mac
- Apple Support — Export photos, videos, and slideshows from Photos on Mac
- Apple Developer — Introducing HEIF and HEVC (WWDC 2017)
man sips— the built-in manual page on any Mac (runman sipsin Terminal)
Frequently asked questions
Related articles

How to Turn Off HEIC on iPhone (2026 Step-by-Step)
Stop your iPhone from saving photos as HEIC. iOS 26 + iOS 18 steps, the hidden Transfer setting, and what to do with HEICs you already have.

HEIC vs PNG: Quality, Size, and When to Convert (2026)
HEIC vs PNG compared on file size, quality, transparency, and compatibility — with a clear take on when converting HEIC to PNG is actually worth it.

HEIC vs JPG: 6 Differences That Actually Matter (2026)
HEIC vs JPG, in plain English: which is smaller, which loses quality, where each one breaks, and when you should convert. With a 2026 compatibility matrix.